|
ForumTree is a discussion forum package allowing
messages to be posted to discussion forums and for these forums to be nested
arbitrarily deep in a directory tree-like structure.
It is designed to provide simple but solid and
flexible security: allowing for the creation of individual users and
"perms" objects which control access to forums,
messages and files.
There are three basic views:
- folder -- displays the contents of a forum; moderate a forum (create, delete or
modify subfolders (subforums) and posts; change permissions and other folder attributes)
- message -- displays a particular message on its own
- manage -- allows management of system user and permission attributes (creation,
modification and deletion of users and permissions)
|
|
|
Introduction
Directories contain messages and child directories (subfolders); they have the
following definable attributes:
- name -- the name of the directory (is used in the forum URL and shown in the folder list);
it cannot contain non-printable characters or the '/' character
- description -- a free-form string describing the forum's purpose (is used in the folder
list)
- rank -- an integer which controls the order in which directories are displayed in the
folder list
- moderator -- a user which is allowed to ``moderate'' -- to create, delete or modify
subfolders and posts; to change permissions and other folder attributes)
- default message perms -- a perm object which is assigned by default to all messages
posted to the forum
- perms -- the perms object controlling access to the forum
The standard folder view is generally divided into three panels:
Directory action panel
First -- the top is labeled "Folder" and is the folder action panel.
Figure 1

The folder action panel in the folder view
Changing directories
You may change to a new folder by selecting its entry in the pull-down
menu at left. To the right is displayed the currently-logged-in
username and, depending upon which user is currently logged in, links
to pages allowing moderation or management of the forum system.
It contains a pull-down selection menu to jump to any folder and links
to login (if you are not logged in), logout (if you are logged in),
moderate (if you have permission to do so), return to the normal view
(if you are currently moderating), and manage (if you are logged in
as the administrator user).
Note that, by default, the current folder is always the first folder
in the selection menu.
Directory subfolder panel
The second panel is labeled "Subfolders" and is a list of sub (or
child) folders of the current.
Figure 2

The folder list panel (standard view) in the folder view
One can resort the folder list by name or description by clicking on the
"Name" or "Description" links at the top of their respective columns.
The default order of sorting precedence for subfolders is rank (see
the directory attributes above), name
and description.
The standard (non-moderator) view only contains folder names and
descriptions. If it is available (if you are the administrator user
or are logged in as the moderator of the forum), you may click the
"Moderate" link in the afore-mentioned action subpanel to be directed
to the moderate forum view.
Directory message panel
Messages are more formally defined at the beginning of the next section. Please refer to it if the concepts
here are unfamiliar.
The message list comes in two basic flavors: extended (generally the
default) and shortened.
Resorting
Note, that in either view, messages can be resorted by author, topic
or date simply by clicking on their respective column headings.
The default view is always threaded (i.e., in-reply-to order).
Extended view
The extended view shows all message attributes (including author
information, topic, attachment names and message text) in a single row.
Clicking on the topic in the extended view will cause the corresponding
message to be displayed on its own in the message view.
Figure 3

The message list panel (extended view) of the folder view
Shortened view
As this list may grow somewhat long, a shortened view is also available
by clicking on the "Short View" button. Each posted message in this view
is displayed on a single line. Attachments are still viewable -- they
are displayed as numbers to the right of the topic. Mousing-over these
links will cause their respective file names and sizes to be displayed.
Figure 4

The message list panel (short view) of the folder view
Clicking on a message topic in the short view will cause the message to
be displayed on its own in the message view.
The extended view can be returned to by clicking the "Extended View"
button.
|
|
|
Introduction
Messages have the following attributes:
- author -- the user who wrote the message
- subject (or topic) -- a description of its contents
- body -- the text of the message
- attachment -- a set of files "attached" to this message
- perms -- the perm object controlling access to this message
Single Message View
In addition to the extended and shortened message views
explained earlier, messages can also be viewed on a page individually,
as seen below in the message view. This view is reached from either
of the other views by clicking on the topic of any given message.
Figure 5
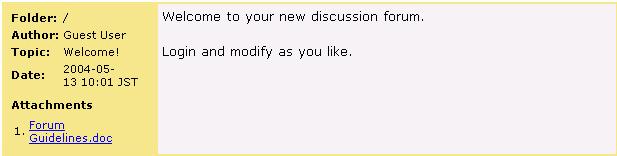
The message view
Post/Reply-to Message View
Messages may be posted to any forum which a user has write permissions
by clicking the "New Message" button in either the extended or short
view message view panel, as seen above. Similarly, messages may be
replied to by clicking the "Reply" button. However, the reply button
is only available in the extended view.
Clicking either button will cause a page like the following to be loaded:
Figure 6
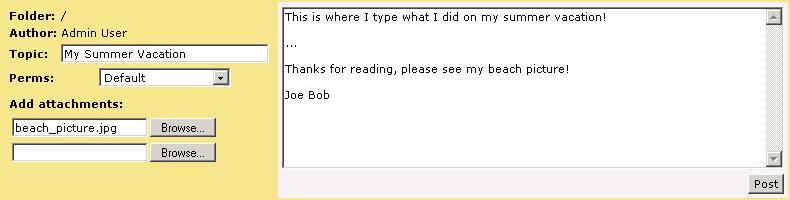
The post message view
In either the initial post or reply views the user has the same options.
The only differences between the two views are that the reply view
has a different label for the submit button ("Reply" versus "Post")
and has default values for the message topic and body (respectively,
the original topic with an appropriate prefix, and the old message
body -- quoted).
Text rendering
Any printable text may be written in the message body composition window
and posted to the forum. However, when displaying the composed text,
the written text rendered into HTML by specialized software which
offers certain features. The following text provides an example.
The first pane has the raw typed text and the second the same text
rendered into HTML.
       Random song lyrics:

     *Waste* by Phish
   Don't wanna be a farmer
   workin' in the sun.
   Don't wanna be an outlaw
   always on the run.
   Don't wanna be a climber,
   reachin' for the top.
   Don't wanna be anything,
   where I don't know where to stop.
   A dream it's true, but I'd see it through ...
   If I could be, wastin' my time, with you.
   ...
   Come waste your time with me
   Come waste your time with me ...

Shopping list:

   * apples
   * pears
   * broccoli

Tabular data:

   *Yr*     *Make*    *Model*  *Value*
   Y86      Chev      Impala   2000
   Y91      Ford      Fiesta   5
   Y96      Chev      Cav      1000
   Y87      Buick     Skylark  2100
   Y88      Chev      Cav      400

URLs:

  http://www.ipcc-nggip.iges.or.jp
  http://www.iges.or.jp

Email addresses:

  billg@microsoft.com
Would be rendered thusly:
Random song lyrics:
Waste by Phish
Don't wanna be a farmer
workin' in the sun.
Don't wanna be an outlaw
always on the run.
Don't wanna be a climber,
reachin' for the top.
Don't wanna be anything,
where I don't know where to stop.
A dream it's true, but I'd see it through ...
If I could be, wastin' my time, with you.
...
Come waste your time with me
Come waste your time with me ...
Shopping list:
* apples
* pears
* broccoli
Tabular data:
Yr Make Model Value
Y86 Chev Impala 2000
Y91 Ford Fiesta 5
Y96 Chev Cav 1000
Y87 Buick Skylark 2100
Y88 Chev Cav 400
URLs:
http://www.ipcc-nggip.iges.or.jp
http://www.iges.or.jp
Email addresses:
billg@microsoft.com
When finished modifying the topic, changing permissions, adding
attachments and composing the message, the message may be posted by
clicking the button in the lower-right hand corner (labeled "Reply"
or "Post").
Update Message View
There are two distinct methods of modifying message attributes.
The moderator of a forum (folder) may modify the author or permissions
from the forum message moderate view (using the 'Update' button to
effect the change), as seen above.
Also, a message may be 'Updated' or edited by any user with write
permissions on it. To update a message, click on the 'Update'
button in the extended view of the message list in the folder view.
This will cause the a view like the following to appear:
Figure 7
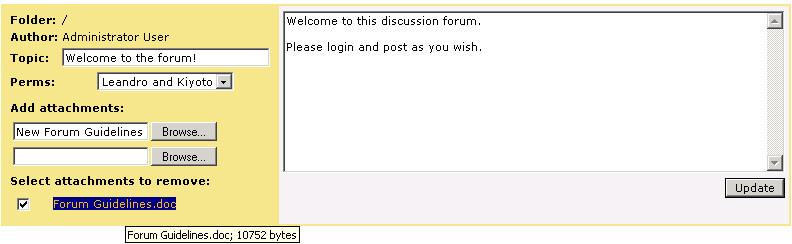
The message update (edit) view
Though the author cannot change the message's folder or author (these
operations being reserved for the moderator via the folder moderator
view), the rest of the message attributes are modifiable here via the
text input box (topic), file input boxes (add attachments), check boxes
(remove attachments), drop down menu (permissions), and text area
(message body).
When finished updating message attributes, commit the changes
by clicking the "Update" button in the lower right-hand corner.
|
|
|
Introduction
The moderator view allows the administrator and a forum's moderator
to create, modify and delete subforums and messages. For these users,
this view is accessible via the "Moderator" link in the upper-right-hand
corner of the directory action panel beneath the username display.
Moderate subforum panel
This panel allows creation, deletion and modification the attributes
of existing subfolders.
Figure 8
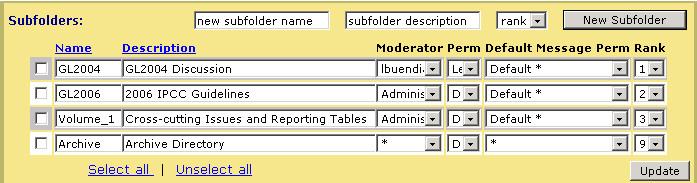
The folder list panel (moderate view)
Folder creation
Creation is accomplished by entering the name of the folder to be
created in the text input box labeled "new subfolder name", entering
its description in the text input box labeled "subfolder description",
and selecting the order in which it will appear by default in the
folder list via the "rank" drop-down menu. When finished click the
"New Subfolder" button.
Folder attribute update
The moderate view contains input fields which allow update of
each subfolder's attributes. Attribute update is intuitive -- simply
enter or select a new value on desired folder entries. (Note that,
as a precaution however, you must select the folders you which to
update by checking the checkbox in its row at the far left.)
When finished updating attributes, the changes can be effected by
clicking the "Update" button in the lower-right-hand corner of the
moderate subpanel (see the figure above), or the "Update" button
located at the bottom of the moderator view (in the figure below).
Figure 9

The moderate view action panel of the folder view
Note: more information on the action panel and its use in
conjunction with both folders and messages is available below in the
moderator forum message view section.
Folder deletion
One deletes folders by first selecting their checkbox and then clicking
the "Delete" button -- located in the action panel at the bottom-left
of the page (displayed in the figure above). Note that folders not
underneath the archive folder are not actually deleted by merely moved
to the archive folder.
Folder relocation
Folders (forums) can be relocated (moved) to other folders within
the system. To move a folder or folders, first select the folder or
folders to be moved by checking their check boxes (to the far left
of their row). Then choose the target directory (where the folders
are to be moved) in the select box at the bottom of the screen at the
bottom-middle the action panel (in the figure above).
Finally, click the "Move" button in the same action panel (see the
figure above). Note that any selected messages will also be relocated
to the chosen target directory.
Moderate forum message view
The moderate forum message view is similar to the
above. It is possible to create and update messages from this view via the same
procedure described above. In addition to the features of that view,
it also allows forum moderators to update the author and permissions of
a message, to move messages to another directory and to delete messages.
Figure 10

The message list panel (moderate view)
The action panel buttons (seen above in conjunction with the folder
panel) are also used here.
Figure 11
The moderate view action panel of the folder view
The "Delete," "Move" and "Update" buttons apply both to selected
folders and selected messages. However, "Link" applies to messages
exclusively. In other words, while the same message may appear
in any number of subdirectories, one directory cannot appear within
(as a subdirectory of) more than one directory.
Message attribute update
The moderate view provides the ability to modify nearly all message
attributes and all directory attributes. Simply modify the desired
attributes in the given boxes, check the select box at the left of
the row to be updated, then click "Update" to submit the changes (for
both folders and messages). Note that only those folders and messages
selected (checked) will be modified.
Message deletion
Messages are deleted in much the same manner that directories are: First select
(check) the objects to be deleted and finally push the "Delete" button.
As with directories, outside of the special "Archive" directory, this
action does not actually cause the selected objects to be deleted
from the system but merely moves them into the archive. This will
cause them to no longer be displayed in the current directory and the
administrator user, at a later date, may (using the same process as
above) delete them from the archive directory -- at which time they
will no longer be available.
At any point before then, however, they may be moved back to their
original location. It should be noted that files attached to messages
placed in the archive are still available with the same permissions
and with the same URL as before the message to which they were attached
was deleted (moved to the archive).
Message relocation
Messages are moved in much the same manner that directories are: first select
(check) the objects to be moved, then select the target directory (to
move them to) in the action panel and finally pushing the "Move" button
to execute the move. Assuming the user performing the operation has
read and write permission on both the current and target directories,
the objects in question will be removed from the current directory
and placed in the target.
Message linking
Links are unique to messages -- directories may not be linked beneath
more than one subdirectory. Link's usage is exactly the same to
that of "Move" above.
It is similar to move except that it:
- only applies to messages, and
- does not remove the message from the current folder
If linking succeeds, both the current and the target directory will
then contain (will display in their respective message lists) the
linked message.
Note that because the two messages are actually the same object, any
update made to the linked message will be seen in both the current
and target directories.
|
|
|
User objects have the following attributes (note that those designated as
currently unused may be entered but are not currently displayed):
- Username -- a name unique to the given user (used to login)
- Home path -- the forum path to which the user is redirected automatically upon login
- First name -- the user's first name
- Middle name -- the user's middle name (currently unused)
- Last name -- the user's last name
- Institution -- the institution which the user represents or works for (displayed in the
extended view author information box)
- Email -- the user's email address
- Phone -- the user's phone number (currently unused)
- Fax -- the user's fax number (currently unused)
- URL -- the user's home page (displayed in the extended view author information box)
- Address 1,2,3 -- three lines for the user's address (currently unused)
- Country -- the user's country
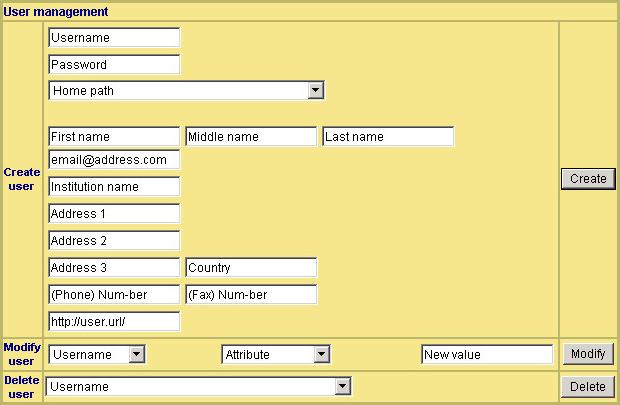
User management -- the creation, deletion and update of user attributes
(above) is accomplished via the user management panel of the management
view, shown here:
Figure 12
The user management panel in the management view
User creation
User creation is accomplished by simply filling in the needed fields
and blanking out the undesired fields in the user creation subpanel
and clicking "Create":
Figure 13
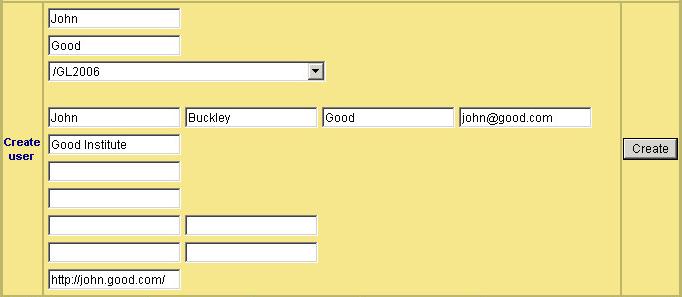
The create user subpanel of the user management panel in the management view
User creation notes:
- The only required fields are Username and Password, though leaving
blank other user information will result in blanks being displayed in
the author information section of the message view (as mentioned in
the message attribute list above).
- Though the field's default values are descriptive, clicking in any
given field results in its erasure. However, mousing-over any given
field will cause a text label to appear describing its purpose.
- Fields to be left without a value should be erased (simply clicking within the field
will accomplish this)
User attribute modification
All of the user attributes above can be modified via the attribute modification subpanel:
Figure 14
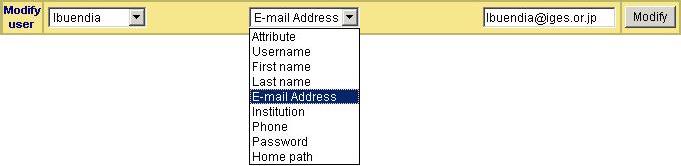
The modify user attributes subpanel of the user management panel in the management view
First select a user from the selection box at the left. Once the
page finishes loading, select an attribute to modify from the middle
selection box. Upon doing so, the current value will appear on the
right input box. Modify the value in this box as desired, and finally
click "Modify".
User Deletion
The delete user subpanel contains only two elements: a pull-down menu to select the username
to be deleted and a "Delete" button to initiate deletion.
Figure 15

The delete user subpanel of the user management panel in the management view
Simply select the user to be deleted and push the "Delete" button.
Deletion of a user currently in use elsewhere on the system (e.g.,
an author of a message, or within a perm object), will cause those
references to be updated to be that of the administrator user.
|
|
|
Perms objects (or, if you wish, the data contained within the objects)
determine whether or not access is granted to another object (a folder,
message or file). The security model used by ForumTree is very simple
and still quite flexible.
Figure 16
The perms management panel in the management view
First let's define the attributes of a perm object. Each perm
object is assigned one unique name identifying it among any others.
In addition to this, a perm object may have one or more of the following
set of attributes:
- user -- a user (as defined above)
- read -- a boolean value (true if the user can read , false if the user cannot)
- write -- a boolean value (true if the user can write, false if the user cannot)
From this we can see that there are only two types of permissions under
the model: read and write. Intuitively, read
permissions allow a user to view the contents of an object (in other
words, to display a forum's contents, to display a message or to
download a file).
Perhaps somewhat unintuitive are write permissions.
As expected, these allow a user to write to an object, but in this
case by "write" we mean "create," "update" or "delete". But, to
prevent chaos, we limit creation and deletion of forums (folders)
to moderators and the administrator user.
For example, a user with write permission on a folder (forum) can
post messages to it (but cannot delete the contents of it -- messages
or subfolders). A user with write permissions on a message and the
forum containing it can update or delete the message (and any file
attached to it).
Note finally that a perms object is meant to form an exclusive set --
only those users granted specific access to the perm may access it.
That is to say that users not specifically mentioned in the perm
do not have any access to the object. The only exception to
this rule is the "guest" user. All users who are not logged in are,
by default, given access as the "guest" user. Therefore, publicly
accessible objects should be made readable as "guest". Very trusting
folks might make them writable by "guest", but this may be ill-advised.
Perms object creation
Permissions are created using the perms create subpanel in the perms
management panel of the management view.
Figure 17

The create perms subpanel of the perms management panel in the management view
A new perm object is assigned a name via the text box on the left.
Then new users are selected via their username and permissions are
assigned to respective users. See above regarding guest user access.
As noted by its name, the perm in the figure above grants read
and write access to user "lbuendia" and read access
to anyone else.
Note that the last perm entry (the drop-down menus labeled
"Username":"Perm" in the above figure) will always be awaiting another
input. (Note: if you have already specified at least one user, you should
simply leave the last entry blank as it is in the figure above.)
Perms object modification
Permissions can also be modified; modification is accomplished via
the perms modification subpanel:
Figure 18
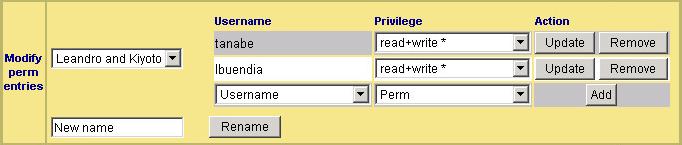
The modify perms subpanel of the perms management panel in the management view
To modify a perm object, first select its name via the drop-down menu on
the left. After doing so, the page will reload and the contents of the
corresponding perm object will be displayed intuitively on the right.
The only difference between its appearance here and the explanation
above is the combining of read and write permissions
into one menu containing elements: read, write and
read+write. (Note that you cannot select a null permission;
if this is what you want, simply remove the corresponding user's
entry from the perm as detailed below.)
Perm entry addition
To add a user to the perm object, simply select their username from
the drop-down menu in the final row of the column labeled "Username",
select the perm they are to have, and click "Add" (in the same row).
The page will be reloaded automatically after the updated has occurred.
Note that a user cannot be added twice to the same perm object.
Perm entry update
To update (change the privilege level) of an existing permission,
simply change the privilege in the drop-down menu of the corresponding
user and click "Update" (in the same row). The page will be reloaded
automatically after the update has occurred.
Perm entry removal
To remove an entry from a perm, simply click remove on the row
corresponding to the user to be removed. The page will be reloaded
automatically after the update has occurred.
Perm object renaming
Perm objects can also be renamed. To rename a perm object, first
select its current name from the drop-down menu list on the left.
Then type its new name in the text box below the drop-down menu.
(Be sure that the name you input does not already exist as this will
cause the rename to fail.) Finally, click "Rename". The page will
be reloaded automatically after the update has occurred.
Perm object deletion
Perms objects are deleted using the perms delete subpanel in the perms
management panel of the management view.
Figure 19

The delete perms subpanel of the perms management panel in the management view
To delete a perm object, simply select its name from the drop-down menu
on the left and click the "Delete" button on the right. Note that if
a perm object is still in use when it is deleted, objects to which it
has been assigned will be reassigned the "Default" perm.
|
|
|